
Sushi, Shopping and Crafts with Yarden
The other night I met up with my friend Yarden for Sushi, a little shopping, and crafts! I always get these coupons from Victoria's Secret, so it was a reason to make this girl's night a reality. We, of course, enjoy these little girl nights and when crafts are involved, for some reason we always get carried away and absolutely lose track of time, and life in general.
We started our evening with our favorite, SUSHI! We had a delicious dinner at Happy Sumo in Norcross, it's close to the forum, and it was just what the doctor ordered! I had my usual Bagel Roll, and their special Volcano Scallop Roll, and it was fabulous! And of course Yarden got her usual California Rolls as always (so predictable)!
After leaving Happy Sumo, we headed over to the Forum at Peachtree Corners for a little shopping. First stop was VS and I had some decisions to make, it wasn't too hard and I used my coupon for some more leggings! The PINK Leggings are the best, I absolutely love them! And luckily I hit it at the right time and get a PINK Dog with my purchase, that was perfect, cause not only was I getting something for me, but I also was able to get something for CHUNK!
Yarden had to stop at Barnes N Nobel for a book, but after that it was onto our crafting! YEAH! So I must start this with the fact that I am a very good and thorough researcher, part of me feels like I should have been a researcher. Anyway, when searching through Pinterest, I stumbled upon a crafting website I had never been before, and I was in a new craft heaven! This website is called Craft Gawker, and it's like Pinterest, but as you can tell by the name, it's just for crafts! So after stumbling upon this, I found a super cool, and fairly easy project for to work on for the evening.
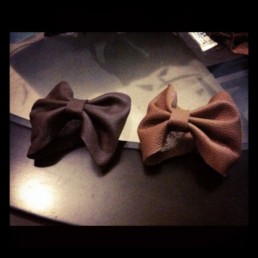
Adorable leather bow bracelets! How fun are these?! Next stop Jo-Ann Fabrics... luckily they are open until 9PM! So the items we really needed to complete this project included.
- Leather Scraps (you can use pleather if needed)
- Button Snaps
- Thread
- Super Glue
Yarden had the thread and Super Glue at the house, so all we needed was the Leather Scraps and button snaps. Yarden and I each bought a bag of leather scraps, and shared our button snaps. You could do this project for $15 or less, and end up with 5 or more bracelets...
So you first start with the leather, cutting out an oval shape measuring about 8-8.5" in length and 4" wide at the middle. Depending on the size of your wrist you can adjust this up or down.

Prepare some thread to be able to wrap around the center, you'll need this once you have leather folded. It was nice having Yarden's help to hold the folded leather, but if you don't have help, you can always use a clip or rubber-band to hold it while you wrap the thread around the center.

After you have the center tied, you will need to sew your snaps on. First test it around your wrist and get an idea of where to best place each snap button. Notice, one snap should be on the front of one flap and the back of the opposite flap.

Once the snaps are attached, you'll want to cut out your rectangle strip to wrap around the center. Again test it out and see what thickness you like and make sure it's long enough to wrap all the way around before you do your final cuts and gluing. After you have your strip ready, you can glue it! I started with a dab of super glue in the center and stuck my bow down in the center and then added some additional glue to the strip as I wrapped it around the bow. Let it dry for a bit and viola! You now have an awesome bow bracelet that totally makes a statement and it doesn't take forever to do! We love crafts!
")

")
I made a few extras... I even did a Navy one with a chocolate-brown center strap! So cute! And lucky for those that comment on the post, you will be entered into a drawing to get one of these adorable bow bracelets compliments of Perdueosity! So be sure to comment!
")
I hope you enjoyed this post and I leave you with Chunk enjoying his new PINK dog! He's so cute!

I LOVE Christmas and I LOVE Scrabble - Why not Marry them?
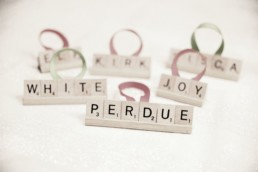
I love crafts and they are especially fun during the holidays! When I came across these DIY scrabble ornaments, I had to make them this year! I love Scrabble and playing it with friends and family on Words with Friends, so it was a logical idea for a cute ornament to give to friends, family and more on gifts or just because!

This is what you need to make these fun ornaments!
Supplies:
- wooden Scrabble trays and tiles
**I purchased this Scrabble Me set and was able to make 8 ornaments from it - ribbon, cut into 5-6″ lengths
- pencil
- miter or hand saw
- white glue

 Directions:
To start, decide on the words/names you’ll be making. I did a mix of last names (friends and family) and short holiday words like "Joy", "Elf" and "Hope." Lay these out on your wooden trays, pairing the words to make the most of the trays. Line the letters up to the outside edges and mark the tray on the inside edge of each word with a pencil.

Remove the letters and cut the trays with a miter saw. This is the most involved part... so be prepared to put in a little man power with the saw! I also sanded the edges a little to make sure the ends were smooth.
Put a small amount of white glue in the center of the tray, stick the ends of the ribbon onto the glue in the center. Add additional glue along the tray and begin to stick the tiles on the tray. Let sit to dry, best to let sit overnight before hanging.

 You should try it out yourself! They are super cute! Check them out on 101 Days of Christmas - Christmas Your Way.

Pinterest Achieved...
So the other day Paul and I completed our first Pinterest Project, the Photo Heart! And I think the relevance of having Pinterest is to be able to achieve those things we think would be great for our life, whether it be for our home, for our taste buds, for wearing or just for fun!
a·chieve
verb (used with object)1. to bring to a successful end; carry through; accomplish: The police crackdown on speeders achieved its purpose.
2. to get or attain by effort; gain; obtain: to achieve victory.
I think I will make this a regular thing, to "achieve" a Pinterest on a monthly, bi-weekly, or even weekly basis. Hopefully more often than not, but we will see as we go. One day when I was searching for the Pinterest logo, I stumbled upon this image (below), and I think this was created by someone with a lack of drive and motivation.

Well, I have achieved three Pinterests last week and have several others in the works! First was our Photo Heart for our bedroom wall...


Second was purchasing this super cool shirt from Forever 21(it was only $23 including tax and shipping - and I probably could have gone to the store for it... but I was impatient and wanted to be absolutely sure I didn't miss out!) .
.
And third was making this fun scarf (and it was even easier and took less time than the blog said)!
I think Pinterest is all about collaboration and inspiration! THere are not to many original things out there anymore, but there is definitely individual personality, desire and achievement, and Pinterest is totally helping me achieve!
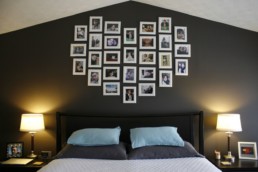
We Did It!!! It's Our Photo Heart!
I've been wanting to do something with our HUGE accent wall in our bedroom for some time now, and to buy art or print large canvas photos for this wall would just cost too much money! I was torn because I wanted to be able to feature images that were meaningful to Paul and I, so I either wanted pictures of us, or photographs Paul has taken.
I found this idea on Pinterest, and fell in love, and was determined to make it happen!  I calculated costs for frames, printing prints, and nails to hang everything, and it wasn't bad (about $120.00 total). Now our heart is about 5 ft wide at the widest point and about 3.5 to 4 ft tall from the bottom most point to the highest point. To purchase canvas prints to cover that approximate space, we would need at least two and at Paul's cost it would be a minimum of $300 (not including shipping)! So doing this cool and sentimental design, not only did we save probably $200 or more, we now have a very cool piece of art that is all about US!
From conception to completion, it only took us a few hours, not including the time it takes to purchase the frames and time waiting to get the prints in the mail. We bought the frames at IKEA ($1.99 a piece), and got the cool metallic prints through Paul's Photography Vendor Smugmug. We got a deal b/c Paul is a photographer and was able to get them at cost, but we did splurge a little for the metallic prints, so you could easily do it for as much or less than we did! And Paul, being very meticulous about design laid out the design on our computer with exact measurements. It was great for us to be able to visualize how it would look! He just took a picture of the bedroom and digitally put in frames with pictures so we could measure out how many frames would fit, based on the size of the wall and the 5x7 size I chose! With the upfront work that Paul did, it only took a small amount of time to hang! I think I spent more time putting pictures in the frames than he spent hanging them. Paul was definitely leery about putting 28 holes in the wall, but as you can see, it was totally worth it! It is AWESOME!

 And you know what I love most about this!?? It can totally be a living piece of art.... as we get new pictures or grow our family, I can swap out old pictures for new ones. I absolutely love that!

Loving My Pinterest!
So I've had an invite to Pinterest for some time now, but hadn't taken the leap cause I knew it would be another thing that I would truly become addicted to and I was right. But with the constant stream of COOL stuff that I find EVERYWHERE, I need a resource to hold all these cool things I would love to have, try, and do, so I'm in it and collecting and adding new things daily to my boards!
 I imagine my account will be huge not too long from now, and it will be a great resource for any and all ideas I've got for our life! Not only that, but I imagine it could be a very good "hint" resource for Paul when it comes to knowing all things I'm into and loving right now! Couldn't hurt!
I've found several ideas I am ready to implement soon. I think my first project will be this one...

But another very cool one that both Paul and I are loving is this! I image this one will be further down the line as we don't really have a bar area for bar stools YET, but it will happen, and these puppies will be in the picture of our bar/living space.

But this isn't just a resource for home decor ideas, it's about anything and everything you can imagine! Whether it's a frame of mind, a frame to put on the wall, a frame you make, or a place to go so you can put it in a frame... you can pin it!
It's like the new "there's an app for that", but now it's "pin it!"
And to top all of the fun decor stuff we will be implementing hopefully soon, I'm also in absolute DIY mode, and Pinterest has totally been feeding my "to do" list of things I KNOW I can make, and they WILL be so cool you'll want to pin them. I think I may start with the Christmas ornaments... It is that time after all.
Either way check it out!
