
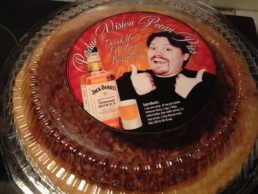
Perdue Vision Pecan Pies - Just in Time for Thanksgiving!!!
Paul has been on a pecan pie rampage! Several months back Paul took the liberty of making a pecan pie for our neighbors. They moved into the neighborhood and neighbors all around were bringing them cookies and candy and all sorts of stuff, but they were surprised having moved to the south that no one brought them a Pecan Pie. And that was Paul's queue!
Paul decided since he had never made them before to make two! One for us to test and the other for the neighbor. And they both turned out AWESOME! Absolutely delicious! We scarfed that pie down in no time! And got some rave reviews from the neighbor as well.
Now with the holiday's approaching Paul decided he wanted to give thanks to his clients and close friends and family with some pecan pies! What started out as a client gift for a few turned into 24 or more pies for many!

So Paul decided to make this into a project, and what better way to share the love then to share the recipe and début Paul's first cooking video! He definitely had fun with this one! Check it out!
[youtube http://www.youtube.com/watch?v=NMiC9R1H7MQ&w=750&h=422]
For detailed written directions, see below:

Perdue Vision Pecan Pies
Prep Time: 5 minutes
Bake Time: 60 to 70 minutes
Chill Time: 2 hours
Yield: 8 servings
Ingredients:
- 1 cup Light OR Dark Corn Syrup
- 1/4 cup of Jack Daniels Tennessee Honey
- 3 eggs
- 1 cup sugar
- 2 tablespoons melted butter
- 1 teaspoon Vanilla Extract
- 1-1/2 cups (6 ounces) pecans
- 1 (9-inch) unbaked deep-dish pie crust
- 1 pie pan
Instructions:
- Preheat oven to 350°F.
- Mix corn syrup, eggs, sugar, butter and vanilla using a spoon. Stir in pecans. Pour filling into pie crust.
- Bake for 60 to 70 minutes. Cool for 2 hours on wire rack before serving.
TIPS: Pie is done when center reaches 200°F. Tap center surface of pie lightly - it should spring back when done. For easy clean up, spray pie pan with cooking spray before placing pie crust in pan. If pie crust is over-browning, cover edges with foil.

Sexy Time Chicken Fettucine Alfredo
Ok ladies and gentlemen, this past weekend we had decided to take on a simple, yet sometimes quite difficult dish. I don't know how many times I've had Fettucine Alfredo that just seems to miss the mark, and there's no way you can ever buy a pre-made jar of Alfredo and get the kind of feeling or response you can with a home-made sauce!
We decided to do this dish since we were having our friend Elaine over and that is her go-to meal, I don't know how often she eats it, but it's one of like three different type meals she likes. Of four, I think it may be her favorite! I want to give you some quoted reviews before I get into the recipe as I want you to be able to grasp the awesomeness of this recipe!!!
"I'm totally getting goose bumps right now! This is so amazing!" ~ Elaine (the Fettucine Alfredo connoisseur)
"I was sitting next to Elaine and can vouch for the fact that she literally had goose bumps all over her arms due to this awesome Fettucine Alfredo!" ~ Paul (who sat next to Elaine)
"When a guy is in the doghouse, if he makes this, there is no way his woman can turn him down!" ~ Desi (speaking from experience!)
Sexy Time Chicken Fettucine Alfredo
Servings: 6
Ingredients:
- 3 Large Skinless Chicken Breasts
- Fettucine Pasta
- Heavy Whipping Cream (32 oz container)
- Cream Cheese (approx 2 oz from an 8 oz box)
- Finely Shredded Parmesan Blend Cheese - 5 oz Bag (includes Parmesan, fontina, Asiago, and Romano cheese)
- Finely Shredded Parmesan Cheese - 5 oz Bag (Half for sauce, half for sprinkling on finished dish)
- 6 Garlic Cloves
- 1/2 Cup of Butter (two sticks)
- White pepper (to taste)
- Black Pepper (to taste)
- 1 Tbsp of Salt (or to taste)
- Fresh Parsley (1/2 finely chopped in sauce) and the rest as garnish
For the Chicken:
Brine the chicken in a 4 hour salt and garlic powder brine. We placed the chicken breasts in a Pyrex dish filled with water mixture which included approximately 4 tbsp of Garlic Powder and 3 tbsp of Salt.
The chicken was cooked on a charcoal grill, searing both sides for about 3-5 minutes depending on size of chicken breast. Once seared, they were moved away from the flame for indirect cooking for about 15 to 20 minutes. (FYI - our grill was only at about 250 degrees, the cook time will vary, but you don't want to cook it too long or the chicken will dry out and get tough!)

Also, the chicken should be on the grill when you start the water for the pasta.
For the Sauce:
Start by dicing up the garlic and simmer with the butter. Once that gets to a frothy boil, add in whipping cream gradually (it is not necessary to add it all at once). Spice the sauce up with your salt, and peppers stirring regularly with a whisk. Whisking the sauce will increase the thickness! Begin to add in the Parmesan Blend and the cream cheese. Let it simmer while you put your pasta into the boiling water (with olive oil). Continue to simmer the sauce while you are working on the chicken and the pasta, stirring regularly as you don't want the sauce to burn! Now add in the Parmesan cheese and chopped parsley. It's almost ready... now taste and add more garlic (fresh or powder) and salt as needed.
To Serve... Place noodles on a dish, spoon on the alfredo sauce, and place sliced chicken on top. Sprinkle with shredded Parmesan and chopped parsley and voilà! You are now ready to get your Sexy Time Fettucine Alfredo on!!!


We hope you will enjoy this and it's effects! It's absolutely amazing! It's not an every night thing as I have no idea how fattening it is, but it is an awesome treat or a way out of the dog house, as this will definitely get you SEXY TIME! ;)
(FYI this recipe is named Sexy Time Chicken Fettucine Alfredo after our "unnamed dinner companions" decided they had to excuse themselves from the dinner table to have SEX after eating this amazing meal!!!)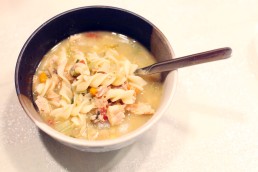
Thankful for Turkey Noodle Soup!
Everything these days seems to be GO GREEN and I have also adapted this methodology in just about everything I do. From the Wal-Mart plastic bags, to the empty soup cans and milk cartons. What about left-over food items? Well I am always combining left overs in the fridge to make custom casseroles and this years Thanksgiving turkey carcass was no exception. One thing I have been doing more of recently in the kitchen is my homemade chicken soup. I really feel like I have perfected the recipe and decided to use the leftover turkey carcass just for this application. Here is my personal home-made recipe for you. It literally is the best home-made turkey soup I have ever had. You can make this same soup using a rotisserie chicken carcass should you choose.

Before you go to bed take your turkey or chicken carcass and remove any meat you can get off the bones and put those aside with your other leftover turkey meat. This is good for turkey or chicken sandwiches you can eat while making this soup. The entire process can be up to 24 hours so you will get hungry along the way. Place the carcass in the crock pot and fill the pot about an inch from the top with chicken broth. Make sure the entire carcass is submerged in the liquid. Leave for the night to cook on low heat and covered.
The next day you will get a large bowl big enough to hold all the liquid from the crock pot. Use a strainer to pour the liquid into the bowl and catch-all the meat and bones. When this cools you will have to go through the strainer to pick out the meat and put back into the crock pot with the liquid while tossing the bones into the trash. Cut up 2 bundles of celery into your size of preference and toss into crock pot. Cut up 4 small/medium-sized onions (white and yellow) and toss these into the mix. Cut up a quarter of a cabbage and toss that into the mix too. Personally I like to get the vegetables smaller so they mix well together. I like tasting a bit of everything in every bite. Add a can of Original Rotel and some salt and pepper to taste and slow cook for another 4-6 hours.
Pick up a pasta of your preference and add this to the mix. I used gluten-free rice noodles because not only are they good for you, contain no wheat but they also do not soften up in the soup like flour noodles. You must be careful here though because if you cook it too long they can turn to mush and ruin your soup. Test the noodles often. Once the noodles have reached an "Al dente" feel and taste turn the crock-pot or stove off and move the soup to a cool. While the soup cools the noodles will soften up even more but not too much.
Ingredients:Turkey Carcass
Extra Leftover Turkey Meat
Celery
Onions
Original Rotel
Salt & Pepper
Gluten-Free Rice Noodles
I hope this soup will blow your mind as it did my own. It's a great way to use the left over turkey carcass and you will make so much of this you will have leftovers for days that do not get old. Also, this soup is a very healthy option, low in calories so you can eat it all week and not worry about gaining a pound. In fact you just may lose some weight!
To make it even thicker and healthier, cut up more cabbage and toss it in. I always find cabbage to be a good soup filler! If you have any questions feel free to call Paul comment!
Our First Chili Cook-Off... Team #14 Chunk Master's Chili
This past weekend was our first Chili Cook-off EVER! And I don't think it will be the last. Paul and I, as much as we love to cook and try new things, we have (neither of us) made chili before. We started the week with a test run, in which we invited Desi and Tristan, and A.J. and Ann over to critique. Ironically it was a split vote! Desi and Tristan wanted a little less meat, and a little less spice, and A.J. and Ann said they liked the meat consistency and would like a little more spice!
So we were split down the middle, so Paul and I took the liberty of trying a new recipe for the cook-off! We started the day off with a trip to Whole Foods, and stocked up on some fresh organic veggies and meats!
We bought:
- 4.5 lbs of Bison
- 4.5 lbs of Ground Lean Sirloin
- 3 lbs of Italian Pork Sausage
- 1 lb of Chorizo Sausage
- 6 Green Peppers
- 5 Onions (mixture of white and yellow)
- 4 Jalapeno Peppers (we only used two!)
- 9 Cans of Beans (Black Beans, Kidney Beans and Pinto Beans)
- 5 Cans of Crushed Tomatoes
- 4 Cans of Corn
- 1 Can of Tomato Paste
- Two containers of beef broth
- Gluten Free Beer
The process was really pretty easy, we sautéed up the onions and peppers with the meats while adding lots of fresh chopped garlic cloves. Once all the meat, onions and green peppers were in the big pot, we added the canned tomatoes, tomato paste, canned corn and beef broth. We used about two or three bottles of gluten-free beer, and stirred regularly as we added fresh jalapeno and an assortment of other spices from chili powder to cayenne to paprika, cumin and more!
After that you add the beans to simmer with the meat, juices and seasonings! And Paul also added a bit of molasses for some sweetness (more to cut the burn) - but not a lot at all!
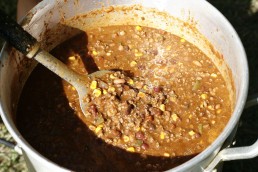
This recipe made 5 GALLONS!
Check out some pics of our booth!

The huge pot for lots of chili!

Doesn't that look delicious!?


Our fun booth - We were Chunk Master's Chili (Chunk our dog inspires us so much!)

Chunk really did enjoy the Chili Cook-off, but his favorite thing was Kara's awesome cornbread! He's telling us here that he wants more!
So the results were in, and while we didn't win, nor did we rank, we made a valiant effort and had repeat customers! I have some thoughts about why things may not have gone our way... and about how it wasn't what I would consider a true test of people's choice on Chili... but c'est la vie! I did bring some into work though, cause we had a good bit left over, and it was a hit!
I think we'll definitely try our hand at another Chili Cook-off in the future, but who knows...

Our First Trip to H-Mart!
In and effort to spice things up with our HC3 Diet, Paul and I have been coming up with new and innovative ideas for lunch and dinner options. We decided it was time to take a trip to the Super H-Mart to get some great produce, seafood and meat options! It was quite an experience! There's an awesome selection, but also a lot of interesting items to choose from!
It was kind of funny because I felt like a "tourist" taking pictures of all kinds of items in there that aren't things we'd normally find in Walmart, Kroger or Publix, like Pig's Tongue, Chicken Feet, Pig's Heart, and more! We stuck with the safe stuff, but it was definitely fun, take a look!
[slideshow]
Hopefully I'll be able to post some cool new recipes with the various items Paul and I decided to experiment with; we are excited! We're working on a homemade tomato sauce that we plan to have with "shredded squid" as noodles! We can't have real noodles, so this seemed like a viable option! I'll definitely post about how it turns out...And I also can't wait to try the awesome Spicy Cod Fish and Veggie Soup, should be easy and delicious!
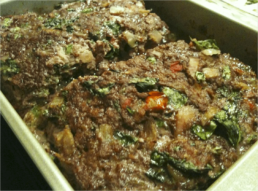
HC3 Approved Meatloaf!
So I got back from Nashville the afternoon of Saturday July 30th and immediately we had friends over for dinner! The original plan was to go to the lake, but the weather didn't permit, so we stayed in for dinner and a movie with Desi and Tristan!
Desi and Tristan have been longtime friends now that we have enjoyed home cooked meals with on many occasions! Of course when they heard about our HC3 Trim diet, and our inability to drink or eat so many things they were quite leery about sticking around for dinner. But Paul, who is an amazing improvisational home cook, whipped together the most amazing dinner that we were all able to enjoy! Of course we cooked up some extras for Desi and Tristan, but the meatloaf was definitely the STAR of the evening!
So here is a quick run-down of our HC3 approved Meatloaf!
Ingredients:
- Extra Lean Ground Beef (1-2 lbs depending on how many ppl you are serving)
- One can of Original Rotel
- Vidalia Onion (1/4 to 1/2 an onion chopped)
- Raw Spinach (1-1.5 cups chopped)
- Fresh Cilantro - key for that awesome flavor (1 cup chopped)
- 2 table spoons Ground Pepper
- 1 table spoon Ground Sea Salt
- 2 - 4 Fresh Garlic cloves finely chopped
- 2 table spoons Fresh Garlic Powder
- 2 table spoons dill seasoning (be generous)
- 2 table spoons thyme seasoning
Mix it all together in a mixer or bowl, whichever suits you!
Put into a non-stick meatloaf pan or Pyrex dish, and bake at 300-325 for about 40-45 minutes. Keep an eye on it to be safe because those temps and time are variable depending!
And voilà! It was absolutely delicious and we had a side of asparagus and Desi and Tristan also were treated with Paul's awesome mashed potatoes! It was a success and better than any meatloaf I have had before! It was healthy and we didn't even need ketchup! Oh and note - it had no eggs or bread crumbs!
Hope you are able to try it!
