
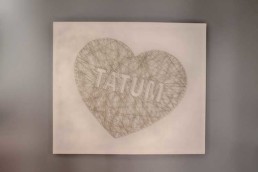
Tatum's String Art...
So we are expecting our second little one in a few days and are finishing off some loose ends before her arrival, including the reveal of her nursery. As part of that post I wanted to share one of my Pinterest projects that is definitely a standout feature in her nursery!
I decided to take on the feat of string art based on this pin I found on pinterest! It's based off the below picture and blog post on VintageRevivals.com.
![DIY-Heart-String-Art-Vintage-Revival[1]](https://perdueosity.files.wordpress.com/2015/11/diy-heart-string-art-vintage-revival1.jpg)
I "loved" how she put the text within the heart of the string art, so we mimic a very similar look with a tilted heart and instead of the word love, we put our baby girl's name "TATUM."
To do this we uses the following supplies:
- Plywood Board... a smoother texture wood so that you don't see a lot of grain or texture behind the heart. Ours is pretty big, around 32X46?? give or take.
- White Spray paint. I went through about 3 cans!
- Nails with a flat top/edge (the quantity will depend on size of your art)
- Embroidery Floss (I wanted the gold appeal that we were going for in the room, so we used the gold embroidery floss) about 100 yards - they come in 7-8 yard sets so you'd need to figure what you need. I will say that the metallic embroidery floss was a bear to use as the strands tend to come apart easily.
- Gorilla Glue
- Mod-Podge Spray Sealer
So we started with a template that Paul (my amazing graphic design master) designed and taped it to the board as a template for placing nails. Once I hammered all the nails in, we removed the template and then spray painted the board and nails white.
Then it was go time with the string! I would knot the string to a nail and then randomly move and loop around other nails throughout the board staying outside the lines of the letters. That part is key! You have to stay outside of the letters otherwise you won't see a name!
Obviously only being able to do 7-8 yards at a time I would glue with the gorilla glue, each knotted end of my string to make sure it stayed secure. Once the glue was dry I would trim the extra string left over.

Once I had gotten enough coverage throughout the piece, I then had to do an outline on the name as well as the entire outside of the heart. This definitely makes a difference in how well you can read the text as well as just defining the heart.
And the finished product turned out great! I would say my total time invested was about 12-15 hours and was able to complete it over a period of about 2 weeks in spare time. It's not the hardest pinterest project I've ever done, but certainly not the easiest either! I was definitely cursing the string I had chosen... but after it was all said and done, I couldn't be happier with the result! It's definitely an integral part of our little girl's nursery!
Stay posted as the nursery reveal is coming soon!!! :)
A New Endeavor In Creativity
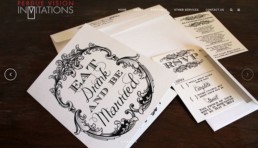
I was unfortunately laid off at the beginning of this year, and while home with Paul and the Baby Man, we decided to beef up our design and printing offering. With my experience and abilities with web development and creative direction, we decided to develop a new site to feature the awesome invitations by PERDUE VISION.
So we are now introducing PV Invitations! Paul has been doing custom design invitations since we first got engaged as we wanted a very specialized design for our own wedding invitations. We hooked up with a great screen printing company in India, and we have fully hand-made and custom designed invitations for every occasion - weddings, bat mitzvah, bar mitzvah, wedding showers, baby showers, birthdays and more!

We also do smaller run, and more budget conscious options in-house, but for whatever your needs, PV Invitations has it covered! Check out the new site and the beautiful portfolio, and check back regularly as we are adding new designs regularly!
Thanks for everyone's support thus far and don't hesitate to contact us about any web and printing needs you have... especially invitations!
Fremont Experience Las Vegas: Supporting a Local Artist
We are back from Vegas now and have tons of pictures and videos to share, I guess that is the name of the game! You go on vacation and when you get back you are playing catch-up with everything from work to personal. So bear with me as I do plan to share everything we did!
I guess we were a bit ambitious thinking we could post stuff daily as we had something going on EVERY day of the trip, and when we got back to the room we crashed only to wake up bright and early to start our next little adventure.
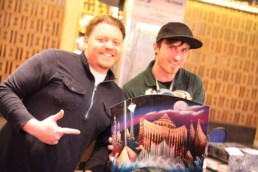
While we were experiencing Fremont Street (in old Vegas), we encountered some awesome artists, from musicians to contortionists to impersonators, but we were most impressed with the work of Mike Fletcher with Visual Art Images.
Mike is a spray paint artist and after talking with him a bit, he let us know his specialty is landscapes. We were so impressed with work that we couldn't leave without capturing him at work as well as purchasing an awesome landscape view of Vegas including the Bellagio and fountain, Luxor, Stratosphere and more! It was amazing how he created this piece of art with spray paint, the occasional stencil, and a putty knife! Absolutely amazing! And as part of the job, all art has to be completed within ten minutes!
Check out these pics and videos! It was awesome!
[youtube http://www.youtube.com/watch?v=KVEb9SliK-A&w=750&h=411]
The above video we caught mid-painting, but as he started we had no idea what the final result would be and it was totally awesome!
[youtube http://www.youtube.com/watch?v=d5U_WAAfMzg&w=750&h=411]
He did a Bob Marley one for our friends... Caught that full show.
[youtube http://www.youtube.com/watch?v=hhTEhPFipNA&w=750&h=411]
And then an underwater scene which was also pretty incredible!

We of course purchased the Vegas Landscape as I was just so impressed with that one!

Related articles
- Our Fremont Street Experience! (perdueosity.com)
Paul's Cranking Out Some AMAZING Artwork!
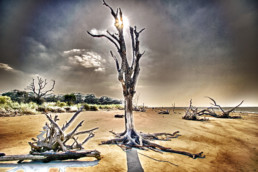
While down in the St. Simon's Island area for a wedding, Paul and I had the opportunity to tour around Jekyll Island. Neither of us had ever been before, so we thought it would be a great new place to check out! For only being seven miles long, it's definitely a photographer's dream, and has plenty more activities that would definitely bring Paul and I back again in the future!
So on to the images! I think we are going to get one blown up as a 30 x 40 for over our bed! Which do you think we should get?? See the full gallery here!

I love the ones with the driftwood, there is a Dali feel, but they also feel so desolate, and I don't know if I want that over my bed!
The tree ones are beautiful, and you'd have to imagine them in black and white b/c that is how we would have the one for the bedroom done!


We really need a horizontal one, but I do love this one! It's got so much color and dynamic! You should definitely check out the full gallery here!
And if you are interested in purchasing prints or canvases of Paul's work contact him via his website paulperdue.com.
Hope you enjoy!

A Chorus Line @ The Aurora Theatre
 Paul's and my parents have season tickets for the Aurora Theatre and on several occasions they've invited Paul and I out to the shows. There have been mostly good, some not so good, but nothing that I would consider spectacular. But Friday night we went to see A Chorus Line, and I've been excited about this show because I really do love the story, and my Mom has said that this is the biggest cast they've ever had at Aurora Theater.
So, what did we think?? It was.........
Well, kind of long. I must say I really did enjoy Marissa Druzbanski who played Diana Morales. She had a great voice and really called our attention for both her solo segments. I especially loved her montage "Nothing."
Generally the cast provided a well-rounded show, but of all the shows I've seen at the Aurora, this was just another "Good" show. I may just be more of a Fox and Broadway lover and even more so a lover of movies...