
Gonna Get My First TOMS! Help Me Decide Which...
So, I've decided to treat myself to my first pair of TOMS, and I'm torn about which to get! PLEASE HELP!!!
 I've been eying the cords for a while and would love those for the winter... but can't decide on color. And if that's the issue, I feel like I can't go wrong with grey... but it's in canvas! Of course a pattern could be fun too. What should I do?? Please let me know what you think!
Homemade Christmas Ornaments: Favors for Our Christmas Breakfast
I know this is a little late coming, but we wanted to post it anyway. Better late than never! As you may read in the previous post, we have an annual Christmas Breakfast, and what's a party without some memorable favors!
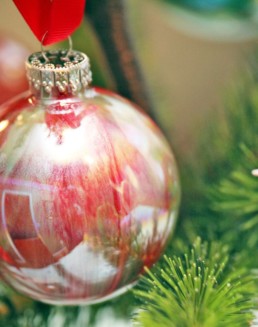
I'm a very crafty person and have always loved to be able to give friends and family something to remember when they leave a happy gathering such as the Christmas Breakfast! So this year, I found the idea for the Color Swirl ornaments, and they turned out great! Everyone was very excited to take one or more home with them!
What you need to make them:
- Clear Glass Ball Ornaments (I got mine at Garden Ridge)
- Acrylic Paints (an assortment of colors - I got a mix of shimmer/pearl paints as well as solid)
- Ribbon (for hanging)
- Card Stock Paper (for tags)
It takes some patience, but all you need to do is remove the metal tops, and pick a few colors you like together and drip the paint inside. Enough to coat about a quarter to a third of the ball going in, and then swirl it around. It also helps to add some water to the paints as they will swirl better, but not too much or you'll have to do multiple coats. Swirl the paint around inside the glass ornament until it is fully coated and then you can turn them upside down over a cup to drip excess paint out (make sure the lip is narrow enough that the ornament will stay at the top). If you don't allow it to drip, it will take a LONG time to dry! You'll want to let them sit for about 24 hours before you put the metal top/hook back in (it's ok if there is a little bit of wet paint in there still).
And repeat for all the ornaments! It's great for kids, or to do with a glass of wine and some good friends! I had the help of my friends Desi and Elaine, and we knocked out 36 ornaments in no time! And they were a hit at the Christmas Breakfast!
Check these beautiful ornaments out! This isn't anywhere close to all of them, and we had some gorgeous ones that got snatched quick!
 Can't wait for next year, I'm already thinking of ideas for favors! The ornament idea is always nice and people can start to collect them over the years, but I also saw something cool that could be used all winter long! We shall see... I'm sure I'll be collecting ideas throughout the year!

Christmas Breakfast Went Off Without a Hitch!
Paul and I have been celebrating the Christmas Holiday with our friends and family for three years now, and this year was by far the biggest! We had more people and more food than ever before (over 30 mouths to feed)!
I'm honestly not sure how the Christmas Breakfast tradition got started, I think it may have started as a friend gift exchange where we decided to include breakfast and then slowly but surely it grew bigger and better each year! I remember the first year we did it, the stove only had one eye that was working and we were miracle workers getting everything knocked out.
This year we had a mix of new and old friends as well as family! And it certainly went off without a hitch! Check out some pics from the festivities!

 We had a total of 10 different breakfast casseroles! A mix of different egg casseroles, a couple hashbrown casseroles and a couple Apple Cinnamon French Toast Casseroles, not to mention all the other great fixing like bacon, sausage, biscuits and gravy, corn-beef hash, our favorite cheesy grits, fruit, and mimosa for everyone!
 We all enjoyed the great food and the happy Christmas cheer and atmosphere. And of course the Christmas Breakfast wasn't complete without the White Elephant game! Luckily this year people were nice and didn't steal too much, and everyone seemingly left satisfied!
 What a fun day we had! All of our friends and family got to take home some homemade ornaments, compliments of Desi, Elaine and myself! Everyone was excited about that!
After everyone left, Paul and I totally crashed! But all the work that went into this Christmas Breakfast was well worth it! Thank you to all of those who came and we look forward to another gathering next year! Merry Christmas EVERYONE!

Bagel Bash 2011: Cruisin' with Awesome Friends!
Our friend Matthew Levine has on several occasions made it a point to plan a cruise around his birthday and this was our second Bagel Bash Cruise so far! Last year there was a break, as Paul's bachelor party was a bachelor cruise!
As with the last Bagel Bash, we planned an inexpensive, 3-day Cruise with Carnival to the Bahamas. We had a nice little group, Matthew of course, Paul and myself, one of my best friends (and my maid of honor) Ashley, and now new friends to Paul and I, Earl and Ron! It was a nice convergence of people, and we had a blast! The weather was wonderful, and the fun was unlimited starting with our first picture... Me having a bit of fun in our cabin!

We were on the Carnival Sensation, a very nice cruise ship! I think between crew and guests it has about 4,000 people on board - don't quote me on that, but it's pretty darn close!

We got on board and immediately the party began! Awesome fruity drinks and great food! We enjoyed just chilling out as we waited for the boat to leave port.

The first night we celebrated Matt's 34th birthday (OLD MAN!) haha. I think every night of the cruise, we had our fine dining experience, and there were at least a half-a-dozen birthdays, and if it wasn't Happy Birthday the crew was singing, it was Happy Anniversary! The meals were awesome, and you could eat anything and everything you wanted. You could order one of everything on the menu if you really wanted!
The first full day, we docked in Nassau, Bahamas and were off the boat by 12 or 1 PM. The weather was gorgeous, you couldn't have asked for a better day to tour around the island.

Of course our first stop was Senor Frog's cause there's always a party there! We had a blast hanging out, munching and of course DRINKING a LOT! Paul even did a beer drinking contest!

And he won!!! We had two LARGE drinks and some shots, we left Senor Frog's pretty toasted! And naturally what would anyone do but get their hair braided when you've got a nice buzz on in the islands...

After braiding, we went to the beach, and met a friendly little beach cat! Such a sweet one... and got a little bit of beach time before we caught the bus back to the boat.

We had a pretty fun day on the island and were headed back to formal night to do dinner and get pictures! Matt was determined to get a nice group picture for his wall! I unfortunately don't have it for the blog (maybe I'll try updating it later with it), but we went to three different stations to get pictures before we were ready to cut loose in the club!

Paul and the guys had a lot of fun this evening, and ironically the ladies cut out early. But Paul did pretty good in the casino's so it was ok that he stayed out a bit later!
The next day Ashley and I were dead set on getting our chairs to lay out ALL DAY LONG! And that we did! We scoped out our spot after breakfast, and then got ready for our day in the sun. Paul and Earl joined up with us around lunch and Matt and Ron were sleeping off their wild night ALL DAY!
But toward the end of the day, Paul, Earl and Matt decided to give the water slide a try! They said it was a lot of fun... I'll take their word for it. I heard it was very cold, and that it was a little painful if you hit the seams the wrong way. But it looks like Paul enjoyed it!

Overall it was an awesome time! Ashley finally got used to the rocking... it was definitely more rocky than normal. And the guys had a great time drinking, eating and gambling. I think our next cruise will be longer, and maybe to somewhere new like the Mediterranean or something! Oh and did I mention, Ric Flair was on the cruise! I included a pic of Paul with him. Matt, Ron and Paul all go pictures with him, and he was a good sport about it!
Fun times! We love cruisin' with great friends!
In Route to Nassau!
No better way to travel than a CRUISE!!! Headed to Nassau on Carnival! Will be a blast with my wonderful Husband and AWESOME friends! Check back for some amazing photography compliments of my Paul Paul!


Our Family Santa Pictures!
Paul, in coordination with Elaine, planned this year's Annual Family Santa Shoot, and of course we couldn't miss out on getting pictures with Santa. We had the privileged of getting pictures with Santa last year, and our dog Chunk has a blast!
So naturally, we have to make a tradition out of it and we got some great shots with Santa for 2011! We had a lot of fun and Chunk really enjoyed visiting with Santa too!
Check it out!


 To get more information about the Santa Shoot, go to SantaShoot.com or you can contact Paul or Elaine by clicking on their names!

I LOVE Christmas and I LOVE Scrabble - Why not Marry them?
I love crafts and they are especially fun during the holidays! When I came across these DIY scrabble ornaments, I had to make them this year! I love Scrabble and playing it with friends and family on Words with Friends, so it was a logical idea for a cute ornament to give to friends, family and more on gifts or just because!

This is what you need to make these fun ornaments!
Supplies:
- wooden Scrabble trays and tiles
**I purchased this Scrabble Me set and was able to make 8 ornaments from it - ribbon, cut into 5-6″ lengths
- pencil
- miter or hand saw
- white glue

 Directions:
To start, decide on the words/names you’ll be making. I did a mix of last names (friends and family) and short holiday words like "Joy", "Elf" and "Hope." Lay these out on your wooden trays, pairing the words to make the most of the trays. Line the letters up to the outside edges and mark the tray on the inside edge of each word with a pencil.

Remove the letters and cut the trays with a miter saw. This is the most involved part... so be prepared to put in a little man power with the saw! I also sanded the edges a little to make sure the ends were smooth.
Put a small amount of white glue in the center of the tray, stick the ends of the ribbon onto the glue in the center. Add additional glue along the tray and begin to stick the tiles on the tray. Let sit to dry, best to let sit overnight before hanging.

 You should try it out yourself! They are super cute! Check them out on 101 Days of Christmas - Christmas Your Way.
It's Snowing On My Blog!!!
Baby's It's Cold Outside... Tis the Season... Let it Snow, Let it Snow, Let it Snow! hehehe How Fun, it's Snowing on My Blog!

Pinterest Achieved...
So the other day Paul and I completed our first Pinterest Project, the Photo Heart! And I think the relevance of having Pinterest is to be able to achieve those things we think would be great for our life, whether it be for our home, for our taste buds, for wearing or just for fun!
a·chieve
verb (used with object)1. to bring to a successful end; carry through; accomplish: The police crackdown on speeders achieved its purpose.
2. to get or attain by effort; gain; obtain: to achieve victory.
I think I will make this a regular thing, to "achieve" a Pinterest on a monthly, bi-weekly, or even weekly basis. Hopefully more often than not, but we will see as we go. One day when I was searching for the Pinterest logo, I stumbled upon this image (below), and I think this was created by someone with a lack of drive and motivation.

Well, I have achieved three Pinterests last week and have several others in the works! First was our Photo Heart for our bedroom wall...


Second was purchasing this super cool shirt from Forever 21(it was only $23 including tax and shipping - and I probably could have gone to the store for it... but I was impatient and wanted to be absolutely sure I didn't miss out!) .
.
And third was making this fun scarf (and it was even easier and took less time than the blog said)!
I think Pinterest is all about collaboration and inspiration! THere are not to many original things out there anymore, but there is definitely individual personality, desire and achievement, and Pinterest is totally helping me achieve!
Thankful for Turkey Noodle Soup!
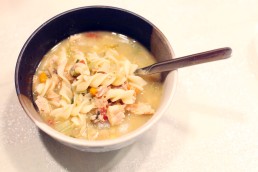
Everything these days seems to be GO GREEN and I have also adapted this methodology in just about everything I do. From the Wal-Mart plastic bags, to the empty soup cans and milk cartons. What about left-over food items? Well I am always combining left overs in the fridge to make custom casseroles and this years Thanksgiving turkey carcass was no exception. One thing I have been doing more of recently in the kitchen is my homemade chicken soup. I really feel like I have perfected the recipe and decided to use the leftover turkey carcass just for this application. Here is my personal home-made recipe for you. It literally is the best home-made turkey soup I have ever had. You can make this same soup using a rotisserie chicken carcass should you choose.

Before you go to bed take your turkey or chicken carcass and remove any meat you can get off the bones and put those aside with your other leftover turkey meat. This is good for turkey or chicken sandwiches you can eat while making this soup. The entire process can be up to 24 hours so you will get hungry along the way. Place the carcass in the crock pot and fill the pot about an inch from the top with chicken broth. Make sure the entire carcass is submerged in the liquid. Leave for the night to cook on low heat and covered.
The next day you will get a large bowl big enough to hold all the liquid from the crock pot. Use a strainer to pour the liquid into the bowl and catch-all the meat and bones. When this cools you will have to go through the strainer to pick out the meat and put back into the crock pot with the liquid while tossing the bones into the trash. Cut up 2 bundles of celery into your size of preference and toss into crock pot. Cut up 4 small/medium-sized onions (white and yellow) and toss these into the mix. Cut up a quarter of a cabbage and toss that into the mix too. Personally I like to get the vegetables smaller so they mix well together. I like tasting a bit of everything in every bite. Add a can of Original Rotel and some salt and pepper to taste and slow cook for another 4-6 hours.
Pick up a pasta of your preference and add this to the mix. I used gluten-free rice noodles because not only are they good for you, contain no wheat but they also do not soften up in the soup like flour noodles. You must be careful here though because if you cook it too long they can turn to mush and ruin your soup. Test the noodles often. Once the noodles have reached an "Al dente" feel and taste turn the crock-pot or stove off and move the soup to a cool. While the soup cools the noodles will soften up even more but not too much.
Ingredients:Turkey Carcass
Extra Leftover Turkey Meat
Celery
Onions
Original Rotel
Salt & Pepper
Gluten-Free Rice Noodles
I hope this soup will blow your mind as it did my own. It's a great way to use the left over turkey carcass and you will make so much of this you will have leftovers for days that do not get old. Also, this soup is a very healthy option, low in calories so you can eat it all week and not worry about gaining a pound. In fact you just may lose some weight!
To make it even thicker and healthier, cut up more cabbage and toss it in. I always find cabbage to be a good soup filler! If you have any questions feel free to call Paul comment!